- Mon Apr 06, 2009 4:47 pm
#6850
I'm surprised they came out this easily. I didn't use a tripod or anything. I didn't even lock in the focal length or anything in the camera. I just focused on a specific item, took the picture, moved a little bit (what I felt was the distance between my 2 eyeballs) and took the second picture. I guess that's cha-cha?
The real work was loading it up in Photoshop to make the dual images. Here are the steps:
1. Open both images in Photoshop
2. In the layer menu, send the current layer of one of the images as the new layer in the other.
3. In the image with the 2 layers, add 4 horizontal guides that are evenly spaced.
4. Set the opacity level of the top layer to 50%. You should now be able to see both images.
5. Use the pointer tool to move the top layer so that the point you focused on lines up with the bottom layer.
6. Select rotate layer from one of the menu items (I forget where this is).
7. Move the center marker for the rotation to be on top of the spot you focused on.
8. Rotate the top layer until outside items line up in parallel to the guides you put in.
9. Repeat for bottom layer if neccessary. Go back to top layer to readjust. Once you are happy, go on to the next step.
10. Choose the rectangle selector tool and select a vertically long rectangle out of the image that you would like to make the 3D image out of. (this generally includes what you focused on, but does not need to)
11. Copy the selection.
12. Select "New..." from the file menu. This should give you a blank document that matches the size of what you just copied.
13. Adjust the canvas size (Image->Canvas size menu item) to be 200% (twice as) wide. From the dropdown of units, you can select "percent".
14. Paste the image (Edit->Paste menu item).
15. Use the arrow tool to move the image to the left or right half of the canvas, depending on whether you are using the left or right eye image. (You can correct this later if you don't remember which is which)
16. Go back to the superimposed images.
17. Switch to the other layer.
18. (Your selection should still be present). Copy that image (Edit->Copy menu item).
19. Go back to the other document where you pasted the first image.
20. Add a new layer.
21. Paste the image.
22. Use the arrow tool to move the image to the empty half of the canvas.
23. Go crosseyed to see if your image looks 3D. If it's wonky, you probably have the left eye image where the right eye image should be. Switch them. Your 3D image should now look 3D.
24. In the View menu, select Zoom to actual pixels.
25. If the image is too big, use the image->size menu to adjust it to be a normal size.
26. From the file menu, choose save to web.
27. I use the second pane and crank up the quailty until it gets to about 250K in size (you can see the image size in the status of each pane).
28. Hit "Save". You're done!
Let me know if I'm not clear on some things. I don't have photoshop on my work computer, but when I'm back home, I'll try to answer any questions pertaining to that.
Also, are there any other programs out there that will do what I've done with Photoshop here?
Adam

 stereoscopic1.jpg (90.35 KiB) Viewed 5557 times


 - By Sp0nser
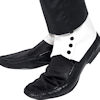 - By evenwind
 - By Spunro
 - By Panman
 - By andynorth