1. What brand of peat moss did you use? There is some junk out there that's more prone to mold and mildew and other nasties. I've used finely chopped sphagnum moss and finely sifted peat moss and it seems (to me in my limited experience) that the sifted peat moss works better for *me*. Something about the sphagnum moss not blending well with the peat if it's a very thick level. I have had good results using a light dusting of sphagnum moss over peat.
I always rinse my peat moss and perlite...others do not. Rinse it good (the peat moss), squeeze it out good, rinse again, squeeze it out good again, and call it "ready". What type of water are you using?
2. Yes, the water trays should be wider/longer than the planters/pots so that a water reserve is available. Nesting same sized containers doesn't work (as you found out). Evaporation happens, it's one of those things. Covering the surface of the water with some type of water plant or something like pieces of foam might help with the evaporation.
3. Punch some holes in *the sides* of your planting trays, just above the bottom. Doing that will prevent the holes from being blocked by the bottom of the water tray. Push some LFSM up in the holes with a nail or something to act as a screen material to keep the grow mix from coming out...or, don't worry about it.
I was big on using weed barrier material until I went to repot a plant. I found the roots had piled up against it rather than the roots exiting the pot into the water tray...a coiled up mess of roots. The weed barrier material worked well in preventing the peat mix from coming out *and* the plants' roots, but I don't think it was actually good for the plant. Since I found that I've been using dried sphagnum moss as a layer in the bottoms of my pots to keep the peat moss mix from coming out the drain holes. It seems most people use sphagnum moss for their "screens".
I found that the weed barrier material does get "slimy" but I don't think it has blocked water from entering or exiting. I usually make my drain holes 1/4" diameter.
In a water tray I don't see using gravel as it would just take up room that water could be using. If you're wanting to simply raise the humidity, then sitting pots on gravel with water in the tray but not reaching the top of the gravel would work. Water tray versus humidity tray...???
4. Planting seeds can definitely be a challenge. I *always* work over a paper tray that I make out of sheet of printer paper with the edges folded upward maybe 3/4" high. I add to this a much smaller (say, playing card size) piece of paper with only three sides folded up that I used as my "planting tool". I empty a quantity of seeds onto the big tray and coax, push, scoop, shove, trick, or otherwise get some of those seeds onto the small piece of paper. I then slowly move this paper over the planting area slowly as I tap the paper to get seeds rolling off the unfolded edge. Keep the paper moving or you end up with clumps. Make a mental note of where on the planting surface the paper runs out of seeds, reload the paper with seeds, and start back planting where you previously stopped...constantly moving and tapping seeds as you go. It's not perfect, but it works for me.

As for quantity of seeds to plant...it's your choice. I tend to plant half of what a seed envelope contains. That is for "insurance purposes" in case something happens bad to the first planting. But, if it is a small quantity of seed in the packet to start with I may go with them all...reason being is that each batch of seeds planted is an investment of time and resources. And, as you mentioned, some seeds don't germinate, some seedlings simply die, and some seedlings do better than others so you have the chance to choose the "picks of the litter" to grow onward.
5. Plants need fresh air and plenty of light. Somehow or another they've managed to survive in the wild without a covering, simply growing on damp ground in full sun.
Getting them out of the water-filled environment of a bag or sealed container starts the hardening off process sooner. Too soon and naturally the tiny plants might turn into crunchy micro-veggie bites, but once they get to looking like a carnivorous plant they should handle the fresh air and full light. Just be easy with the lighting to start with. Most plants that I've started beneath lights I take a few days and gradually open their container to allow more and more fresh air inside. When I finally remove the covering completely they're fine with the light that they've grown accustomed to growing beneath...but, I wouldn't immediately take them outside and put them in my full, south Alabama sun...that wouldn't turn out well.
* You mentioned "feeding". Plants at this age really don't need feeding. They're plants and make their own food through photosynthesis just like other plants do. Good lighting would be more important to them. Feeding can actually cause problems with....excessive mold growth. Personally, I would not be feeding right now...some experienced growers probably do feed, but I'm not experienced enough (in my opinion) to be feeding plants of this age. Let'em have "baby food" (good light) for now and later when they're bigger give'em the "meat and 'taters".
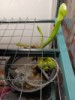
The fan is a good idea. I would move it further away from the plants than what the photo shows. You just want some air movement, not necessarily a strong breeze. I've taken a quarter-inch wide strip of paper towel and hung it beside my pots to act as an anemometer
...if I see it moving a tiny bit I know I've got air movement/exchange happening around my plants...good enough.
It sounds like you're having fun with your plants...that is the big thing. Keep the fun in it and it'll be a good, long-term hobby. Best wishes!
htbm wrote: ↑Tue Nov 28, 2023 2:08 am
Some "note to self for next time" thoughts on this setup a little over a month since coming out of cold stratification:
1. Should have boiled and/or microwaved media and/or used finely chopped sphagnum instead of peat/perlite/sand soaked in peroxide. Peroxide may have cut down on the mold, but I've been battling it since even a couple weeks before they came out of the fridge. Even a good spray of recommended-CP-safe fungicide only knocks it down for about a week.
2. Nesting the trays with media/seedlings/holes in another tray of the same size to hold water with some gravel for spacing seemed like a nice idea but it's basically impossible to see how much water is in the tray to make sure there's enough. Wasn't long before I gave up and switched to a single large tray (same style as a 1020 or 1010 but an odd size in between to fit the space/seedling trays). Unfortunately I lose a lot more water to evaporation this way.
3. Probably should have put bigger holes in the trays for water to get through and/or should not have used weed barrier cloth to line them. Although supposed to be water permeable I think it still has a hard time soaking through. Especially with the fan going sometimes I find they are drying out too much despite sitting in water. Eventually I tried to slice through it with an x-acto knife poked through the holes but it's still an issue sometimes. Maybe need to put them back on gravel to keep the holes from being blocked by sitting on the big tray ridges.
4. I perhaps should have been less conservative in how many seeds I used. There are a lot more plants than I'd want as adults, but a lot less than expected germinated so far, and some of them are strangely clumped together, and it'd provide more selection and more backup in case some die from e.g. mold or dehydration issues.
5. Probably would have been better off keeping the lids on longer but I was already fighting mold. I think if I changed my media/sterilization setup I would do so.
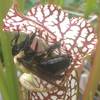
Lastly, I think I need to find a decent lighted magnification setup for feeding. Not enough room and not high enough to be comfortable feeding while under the grow light; not enough ambient light elsewhere, and a bit awkward to try to hold a flashlight, magnifying glass, and syringe all in just two hands.

 IMG_0380.JPG (1.85 MiB) Viewed 1225 times

 - By wcrosman
 - By ChefDean
 - By Garden_Nymph
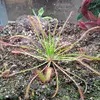 - By Dejavert
 - By Panman