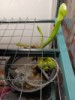
Below are some photos to show you how high I have my lights right now. The...the two 3-panel garage lights (80watts), three Yescoms(22watts), and the single Viparspectra(100watts) that I've got hanging...your lights are a total of 20watts, for comparison. How does it feel to the back of your hand when you hold it, say, a foot below the lights?
IMG_2186 (Custom).JPG (532.1 KiB) Viewed 467 times
IMG_2195 (Custom).JPG (572.08 KiB) Viewed 467 times
IMG_2257 (Custom).JPG (626.95 KiB) Viewed 467 times
Is this photo of yours the current height of the lamps? I dunno...they just seem too high to me, but I'm probably missing something here.

Did the pot dry out badly beneath the lights, or maybe just the top layer of moss?
As for the drooping light... What about putting a nail or hook, just inside the bookshelf (where it won't be really visible) about a foot higher than the curve of the neck. Tie a nylon/sisal/cotton/whatever string, or maybe some wire, from the hook to roughly the middle of the lamp's neck pull it up snug a little above where you want the lamp at...that probably would keep it from drooping. Kind of like somebody with a sling on their arm.
There is also what is referred to as "mineral burn" that will give the plants a "burned" look and will kill the plant if it continues. The mineral burn comes from using a grow mix that is high in minerals or highly mineralised water (usually well above 50PPM). Another thing that can cause it is a build-up of minerals in the water tray...the trays need dumping and washing out once in a while to remove minerals left from when the drain water evaporates (you need to let the tray stay dry for a day or two before watering again. Top watering helps with washing impurities down and out of the grow mix into the tray...that water needs dumping after it drains. Top watering will also help pull some oxygen down into the mix. Top water maybe every week or three. Just some thoughts....
The Premier brand will work well. I rinse pretty much all my ingredients...I'm "OCD-Me", remember.
A 5-gallon bucket and a paint filter bag makes things a little easier. But, with the volume that you're working with you shouldn't have a difficult time rinsing it. You'll see a heavy "milk" residue when you rinse the perlite...though nice and white-looking, it can have "stuff" in it that we don't want. A couple of rinses of the perlite and it will clear up a lot. The peat moss will forever give off it's tea/coffee color but it will be clearer after 2-3 rinses. You're reducing the chances of mold and mildews from growing in the pots by rinsing...and lowering the TDS level a good bit. I've mentioned it before...lots of the experienced growers do not rinse their stuff and do good. Your choice to rinse or not.
Btw, I may have already mentioned it but a TDS meter is an excellent tool to have on hand...lots of uses for it. Very handy. $15 on Amazon and with care they last a long time...here's the one I got:
TDS Meter
The peat will indeed continue to decompose, but not quickly. I mean, it's been in the ground for probably several years already. Store it out of the sun and rain. Someplace where ants or "critters" are apt to tear into it. You're in a cooler environment than I am so you have that added storage benefit, too. It should last for a good long while. To insure it doesn't go bad you need to get more plants to use it up faster!!!
I went through the "Do I measure things by dry volume or wet volume" phase. The reason I stressed over this is that the peat will compress some when wetted so it becomes an apparent smaller volume. But, the peat will fluff back up some and somehow be "good" with the perlite. If you feel like you won't have enough peat moss in the mix then do what I do...I usually use a heaping, rounded off container full of peat moss but a level container of perlite. The easiest and simplest way is to measure them dry. Take an appropriate sized container and scoop out ever how many scoops you think you need. I then rinse/wash this ingredient and set it to the side when finished washing. Then I take the second ingredient and scoop out the same amount of it as I did the first one...(using the "heaping rounded off" method, if I want to). Thanks to the more experienced and *very* patient folks' advice on the forum they convinced me that it isn't rocket science!
The measurements don't have to be exact...get it as close as you can and it should work.
5-1/2" pots should work well. Just keep the water below about 1/2" and let it dry out between waterings. Flytraps like it moist but don't want but only want the tips of their toes below the actual water level. I would drill 3-4 holes in the sides of the pot, just above the bottom...that way the drain holes won't be able to get blocked by sitting on the flat bottom of a water tray.
You definitely want the moss moist. By rinsing/washing the peat moss it will be good and moist when you're ready to use it. After the last wash squeeze it out as much as you can and it should be ready to go!
If the mix that the flytrap is in now is a fine, squishy, almost slimy mix...I'd repot it. The roots need to breath and once the mix breaks down (or is poor quality to start with) it hinders oxygen/air getting to the roots. With a fresh peat:perlite mix it should drain readily and allow oxygen to get to the roots. Also, wcrosman mentioned that the store probably used tap water to water the flytraps...lots do, they don't know any better (or don't care). So you might even want to take the roots and swish them around in some distilled or rain water to rinse them gently. Once you get the flytrap planted in it's new digs then top water it to settle in the mix around the roots...dump that drain water. I'd probably let it sit a day before filling the water tray. Be sure you have a bit of the white rhizome sticking out of the mix...don't plant it too deep.
It sounds like you've got the ingredients that you need. Best wishes and...have fun!


 - By ChefDean
 - By Garden_Nymph
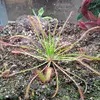 - By Dejavert
 - By Panman