FlytrapCare Carnivorous Plant Forums

Sponsored by FlytrapStore.com

Discuss Drosera, Byblis, and Drosophyllum plant care here

Moderator: Matt

By TENroaches
Posts:  105
Joined:  Mon May 04, 2009 11:06 pm
#47798
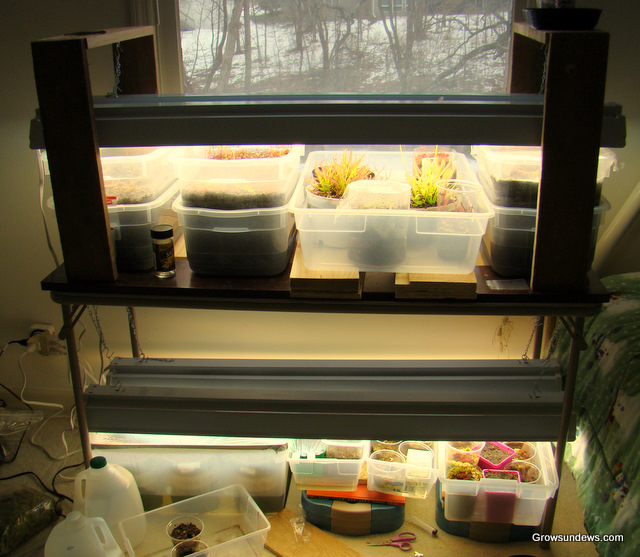
sundewman wrote:As for your 2-level idea, you could easily pull that off. Not sure if you can get a 5 bulb T-5 fixture for cheap, but if you can't, I just use two 4-foot T-8 fixtures hung next to each other (together they cost $20 at wal mart).
In this picture, you can see I'm using a card table:
Image

I simply hung the bottom-level light fixtures from the metal supports on the side of the table. Honestly with your nice growing rack, all you have to do is find anywhere on that metal grate that you could hang tose metal hooks on and it should work (you have tons of options). Since you're only going to have 1 seedling pot down there, you would really only need 1 T-8 fixture and it will do just fine. Then you can hang the lights at any level you want on those metal chain things. I don't think you need a whole new T-5 fixture if you're only going to have a few more seedlings. Plus, T-8s or T-12s get the job done just fine...you'll just have to place the lights a bit closer than you would with T-5s (within 6 inches). You won't need to run a fan for these fixtures either. Germinating by a window should work as long as it's extremely bright and the seeds are very fresh. If not, you will get a very poor germination rate.
I didn't explain what I meant very well. I was thinking about racks I've seen where there is a light on top and then two shelves beneath with plants. But only one main light up top. I don't know how that could work.

I might shock the crap out of an adelae by repotting it and putting it under lights instead of a window, maybe with some humidity. See what happens..
By TENroaches
Posts:  105
Joined:  Mon May 04, 2009 11:06 pm
#47799
sundewman wrote:looks great. Those are the exact same fixtures as mine except they didn't carry the stainless steel black version here. That's going to work very well!
But they're so DIM! I guess since I own them, I might as well try them before buying a high bay version with parabolic reflectors. Mine isn't black, it's kind of a grey. I might try putting mylar behind the bulbs to see if it helps at all.
By sundewman
Posts:  291
Joined:  Sun Mar 07, 2010 7:21 am
#47803
Hmmm... well I may have seen that with Nepenthes or something, where they didn't have a tray that blocked out most of the light? That way there would still be a reasonable amount of light getting through. But I'm really not too sure...normally I've seen setups like what you have now, with lights at each level. I suppose really low light plants could be grown below such as D. schizandra, or Adelae but the Adelae certainly wouldn't look anywhere near it's prime in that little amount of light.
What you have now will definitely work.

I found a pic of Av8tor1's rack on another forum (you can see pots below this plant and no light):
http://bluegrasscarnivores.com/feb07_2010/D_villosa.jpg

Seems there isn't anything special down there though. He mentioned he puts Nepenthes on the lower shelves in another post, and he also mentions that he top-waters all of his sundews daily (possibly all his plants too) so this allows him to not have to use a tray.
I don't have that much time though...plus I'm not even here for 3/4 of the year..
By sundewman
Posts:  291
Joined:  Sun Mar 07, 2010 7:21 am
#47805
Also, to compensate for the lower light production, all you have to do is place the T-8 bulbs within 2-5 inches or so of the sundews and they will turn just as red as the T-5s being 1.5-2 feet away.
I'll post a pic of how close my Graomogolensis is to my T-12 lights soon...
By TENroaches
Posts:  105
Joined:  Mon May 04, 2009 11:06 pm
#47813
sundewman wrote:Also, to compensate for the lower light production, all you have to do is place the T-8 bulbs within 2-5 inches or so of the sundews and they will turn just as red as the T-5s being 1.5-2 feet away.
I'll post a pic of how close my Graomogolensis is to my T-12 lights soon...
My T5s are 5-6" away... :-[ They should be 1.5 feet away?
By TENroaches
Posts:  105
Joined:  Mon May 04, 2009 11:06 pm
#47815
Okay, I went at it with some mylar. I think there's some improvement, but I'm not sure this hack job won't burn my house down. I only did the one on the left in these pictures. It's kind of parabolic in shape, rather than just contouring to the flat back of this model.

My befores:
Image

Image

Some afters:
Image

Image

Image
^^The one I hacked.

Image
^^The one I didn't hack.

Image
^^The one I hacked.

Image
^^The one I didn't hack.

Image
By sundewman
Posts:  291
Joined:  Sun Mar 07, 2010 7:21 am
#47816
Wow those T-5s do make the T-8 look like moonlight lol
At first glance (not realizing the camera is compensating for brightness) I would have thought the bulbs weren't working, but I see that when you take shots of them seperately, you can see the glow much better.
I think your "hack" is working well. Did you just put mylar behind the bulbs? I hadn't tried that before, but it looks like it works well.

Here are some T-12 pics I promised:
Image
(I had just fed the graomogolensis before this picture, so all the leaves are curled around the food)

these are about 6 inches away but still color up very nicely:
Image

You can see the lights have been hung at an angle to accomodate my taller pots to the left of my grow area in the basement.
By TENroaches
Posts:  105
Joined:  Mon May 04, 2009 11:06 pm
#47818
I didn't just put mylar behind the bulbs. See, at one end, the end with the pull chain, there's a black box. Initially, I was going to have the mylar go up over this, to give a curved backing behind each bulb. I saw I had a pack of AA batteries I bought recently, so I took the batteries out and used the empty packaging for the other end, because it was about the same height and width. This didn't give it the support it needed in the middle, though, so I took some corrugated cardboard, three layers deep (about the height of the black box), cut to the width of the black box, taped them together, and taped it along the middle. This worked. But then I realized I shouldn't be enclosing that black box; it probably gives off heat or something. I cut out a hole in the mylar to expose the black box. So the black box was the reason I picked that size, but I didn't even use it as support.

So behind the lights isn't just flat mylar, it's curved, like an "n" behind each bulb, connected by a "u" in between.

I backed the other one with mylar, just along the metal that's already there, to see if there was any difference.
Image
Image

It's still not great, but compared to before -->Image it's an improvement.

I was looking at the one I put curves behind, and I thought "maybe if I pinched along the middle hump to give it more of a point, that would help. So I tried it. (If I did it over again, I would just fold the mylar along the dead middle of the piece, instead of pinching after it's on.) My pinching was blind for the second half, and I curved to one side. I still think the pinching helped.

This was before pinching:
Image

And this was after pinching a crease into the middle:
Image

I didn't get the crease the whole way back to the close side, and you can see I hook severely to the right with it in the back, but plants aren't picky about neatness.

The reason I'm not sure about it is because of the paper products I used to shape it, behind the mylar. But I think this shaped backing is better than just lining the fixture with mylar.

I may try to add parabolic curves to the flat one, and be neater about it, and not use paper products in the shaping. Maybe crinkle up some aluminum foil and put it along the middle. Sounds like a project for tomorrow.
By TENroaches
Posts:  105
Joined:  Mon May 04, 2009 11:06 pm
#47850
I redid the parabolic one. I also took a picture of what I had behind the mylar in case you were curious.

Image

All I did now was put the mylar on a hard surface and put a nice crease along it with my fingernail, making it as straight as I could, holding it straight with tape as best I could. I taped each "U" behind each bulb into place against the side, and I cut out around the black box again.

It ended up like this:
Image

In this picture, I'm putting no pressure on it with my hand. You can see how the area between the bulbs isn't curved right, because there isn't much reflecting downward:
Image

In this one, I'm putting a little pressure on it, pushing upward to change the curvature slightly, and you can see the difference:
Image

If I can just add some tape to keep the mylar like I'm holding it in the second picture, I think I'll be onto something. It really does look like I have three bulbs per bulb like this, doesn't it? I'm not regretting this purchase as much anymore. I'm not regretting buying way more mylar than I thought I'd need when I bought it last summer, either.

Once I get it right, I guess I should make a second one.
By TENroaches
Posts:  105
Joined:  Mon May 04, 2009 11:06 pm
#47864
A question unrelated to my lights: I took some cuttings from some adelae that may or may not have been dying. I have them floating in distilled water. Should I keep them in the window where the adelae had been living, or give them more light, like on the shelf under my T5s? I could even put them on the shelf under the T8s with the T8s off, as the T5s still light it up under there. Or I could put them in a bright south-facing glass block window with my nep...
By sundewman
Posts:  291
Joined:  Sun Mar 07, 2010 7:21 am
#47866
Well, I had luck with leaf cuttings the first time in very little light, so a windowsill might work. I had mine next to a window a foot under a single T-12 light (so the bottom rack might work too). I haven't heard the greatest reports from people trying to take leaf cuttings using the floating method on a windowsill though for a reason I can't figure out yet. It seems that on a windowsill, a soupy mix of diced long-fibered sphagnum makes the cuttings last longer and strike at a higher rate.
Another grower placed moist peat in a jar and laid a wet paper towel over it, and put cuttings on top of that. He then put it next to a dim windowsill and he said they take a month that way.
Haven't tried that one though....
By TENroaches
Posts:  105
Joined:  Mon May 04, 2009 11:06 pm
#47877
I just repotted all my little adelaes. I won't be surprised if I end up with no adelae. The LFS it was in was bad... the whole top was black and hard. Black black. And the bottom half of the LFS in the pot had lots of algae. The plants had huge roots (not that I know anything about root length with adelae). Some sections of roots were black black, too. I imagine that this is what kept my plants from surviving, but I don't know what causes that. Not enough water? Fungus? Algae? Mold?

Long roots:
Image

In that picture, you can kind of see how the root is striped black and white as it goes down. That's probably not good.

I have one plant back in a death cube, some in tupperware with saran wrap on top, some are just cut up plants, some are intact plants, I cut up some roots and put them in one, I have one back up in my window. I have some under my T8s and some in the shelf under my T8s. I decided to turn on one side of the T8s to put some sundews on the shelf about 1.5 feet below them. I bet I'm going to kill them all. If that's the case, I'm going to give up on adelae. Unless I get seduced by one at Lowe's like I did last time. :(

Too bad you moved away, you could come get these t[…]

Hello. I have a N. dubia that is right now in flow[…]

Sundew in forest

Why D. capillaris? D. brevifolia is the sundew sp[…]

Oh, that is a solid size. Wonder what it'll look l[…]

Succulents Question

Hello beautiful people! I have a quick question. O[…]

Welp I lost the original post. :shock: Anyhoo I […]

I said the cuttings some of them just kind of die.[…]

I recieved my seeds, yay! Thank you, ChefDean Sen[…]

Support the community - Shop at FlytrapStore.com!