FlytrapCare Carnivorous Plant Forums

Sponsored by FlytrapStore.com

Discuss water requirements, "soil" (growing media) and suitable planting containers

Moderator: Matt

By davinstewart
Location: 
Posts:  343
Joined:  Sat Jul 13, 2013 2:29 pm
#420746
I was worried about the tight fit as well. Turns out it's not an issue at all since the bags don't conform perfectly to their surroundings i.e. the corners and edges are rounded enough that there's lots of room for water to flow while the bags are still cheek to cheek. Here's a few pics of grow bags on my watering table. I've filled in the gaps between bags with some hydroton clay balls to further optimize the space.

You can see that they are far from a perfect fit around the corners and edges. Lots of room to breath.

Hope that helps!
Attachments:
20220924_084758.jpg
20220924_084758.jpg (3.58 MiB) Viewed 2691 times
20220924_084744.jpg
20220924_084744.jpg (1.77 MiB) Viewed 2691 times
20220924_084731.jpg
20220924_084731.jpg (1.83 MiB) Viewed 2691 times
20220924_084722.jpg
20220924_084722.jpg (1.25 MiB) Viewed 2691 times
Dan V, Intheswamp liked this
By davinstewart
Location: 
Posts:  343
Joined:  Sat Jul 13, 2013 2:29 pm
#420747
Oh, one additional tip ... when you fold the bags down fold them in, not out. All the pictures show the bags folded out so the black interior is showing but if you fold them in instead then you've got an unbroken white exterior which should keep temps cooler in the summer heat.

As for moving the bags around, I haven't had trouble with them ripping and they seem well constructed but this is the first year I'm trying them. I suspect the plastic will eventually break down in strong sunlight. Just don't know when that'll happen. The bags and soil are study enough that they retail their shape without any help from me and I've been able to pick them up and reposition them without issue so far. They naturally want to conform to a circle shape but can also be "molded" into any shape you like, especially if you're filling the bags up nice and full.

Hope that's of some use.
Intheswamp liked this
User avatar
By Intheswamp
Location: 
Posts:  3406
Joined:  Wed May 04, 2022 2:28 pm
#420748
Great info and a great looking setup you have there (and a full one ;) )!!! :D

I can see how the bags are "rounding out" and making room for the water flow around them. Are there holes in the bottoms or only in the sides? How far above the bottom are the holes?

Good info on folding the bags inward, rather than outwards, too!

Thanks for taking the time (and the photos) to respond here! I'm still scarfing a container here and a few there...trying to figure out where I'm heading with this. I don't anticipate getting quiet as deep into the hobby as you and others have gotten, but you never know. ;) So, the few odd containers I come up with are working out. I'll probably smack myself on the head one day when I've got a kazillion different containers and decide I need to standardize!!! :lol:
By davinstewart
Location: 
Posts:  343
Joined:  Sat Jul 13, 2013 2:29 pm
#420754
Yep, you bet. Happy to share!

There are factory punched holes on the bottom and about 1/4-1/2" up the sides. You can always punch/melt more holes if you want though.

One thing to bear in mind is that the bags ship flattened out and you fold them in a certain way to get a flat bottom. That usually means you lose several inches of height to the bottom of the plant bag once it's in its final form. So for a bag that's 12" long when flat it'll actually be around 7" tall once it's in its final form. That's why the holes look like they're way up the sides. The first row of holes are actually on the underside of the plant bag once it's folded out.

Hope that helps!
Intheswamp liked this
User avatar
By Intheswamp
Location: 
Posts:  3406
Joined:  Wed May 04, 2022 2:28 pm
#422607
We had a small get-together for our pastor at church the other night. I was the last one there and was taking out the garbage when this cake cover "kind of fell out" of the bag and followed me home. :mrgreen: It should make for a nice humidity dome. The bottom tray is rather weak, though, so I might just use this to set on top of some large white trays that I already have. Punch a few holes in it. Probably a one or two season dome, I would think. But, the price was right! :D
Attachments:
IMG_6270 (Custom).JPG
IMG_6270 (Custom).JPG (405.33 KiB) Viewed 2523 times
TrapsAndDews liked this
By Sundews69
Location: 
Posts:  2388
Joined:  Fri Dec 03, 2021 5:57 pm
#422613
Yes, I've done that too! My grandma had a ton of them from church and let me use them for plants. They don't really fit too well because the lid is too short but I made it work.
Intheswamp liked this
User avatar
By Intheswamp
Location: 
Posts:  3406
Joined:  Wed May 04, 2022 2:28 pm
#422615
This one is 5" deep. My small seedling pots are 3" tall, so they'll work fine.

I've also got some 18" long planters that I'm thinking about start several varieties of filiformis in, they are 5" deep so at the worst there will be some ventilation at the bottom if the dome sits on the top edge of the planters. Later on I can always jack up the dome some as the plants get a bit taller...will help in hardening off, even. Yep, they're not perfect but appear to be for the cost! ;)

Oh, and the cake was pretty good, too!!! :lol:
Sundews69 liked this
User avatar
By Intheswamp
Location: 
Posts:  3406
Joined:  Wed May 04, 2022 2:28 pm
#428098
I had been thinking about these cup lids and finally grabbed a few yesterday. I had to make a Walmart grocery pickup yesterday and Sonic has a strategically placed Sonic hamburger joint positioned directly across from the main entrance to the store. Naturally, I'm a sucker for a chocolate shake, so...

I ordered a medium chocolate shake, with saving the lid firmly on my mind. I pulled into one of the stalls when a nice lady walked up to me and informed me that they were only taking orders through the drive-through because of a shortage of employees. Cool, this was even better being as the person waiting on me would be right beside a stack of the nice cups lids. Otherwise, it would have been iffy asking a server at a booth to go back in and bring me some cup lids...or, to order them over the speaker. Any how, I ask the young guy who handed me my milkshake if I could have a couple of extra lids...he was a tad surprised/confused but he handed me three extra lids! Maybe the element of surprise got'im! :mrgreen:

Anyhow, these fit 20-ounce styrofoam cups and, from what I can tell, 16-ounce cups...I start my pepper and tomato seedlings in 20-ounce cups so I've already got those...nice and deep, easy to poke holes in at the bottom, and insulated. ;) 
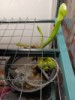
I'm thinking, though, that the cups might be a bit deep for starting seeds in as the top surface will be a long way from the water in the tray...??? The dome seems like it will make a nice humid environment for starting seedlings in but yet have a nice open area above for air exchange...kinda like a muggy south Alabama bog...high humidity but open to the sky. Here's what I'm talking about... Feedback welcome! :D
Attachments:
IMG_7341 (Custom).JPG
IMG_7341 (Custom).JPG (254.23 KiB) Viewed 1984 times
IMG_7310 (Custom).JPG
IMG_7310 (Custom).JPG (182.3 KiB) Viewed 1984 times
User avatar
By Intheswamp
Location: 
Posts:  3406
Joined:  Wed May 04, 2022 2:28 pm
#429845
Anybody ever use Keurig coffee cups to start small seedlings in? Our daughter gave us a Keurig coffee maker this past Christmas, though we use the regular pot-making feature we do use some Keurig cups. Is it worth the hassle of going with a container so small? I'm mostly interested in putting germinated sundews in them and then potting them up to larger pots when they get a bit larger. Measures 1-3/4" across top, 1-3/4" deep, 1-3/8" across bottom. Already has a drain hole, too! :mrgreen: (But you might want to add one or two more. ;) ).
Attachments:
IMG_8126 (Custom).JPG
IMG_8126 (Custom).JPG (219.31 KiB) Viewed 1866 times
User avatar
By Panman
Location: 
Posts:  6377
Joined:  Wed Mar 04, 2020 8:41 pm
#429846
I wouldn't mess with it. The circles don't fit in a tray easily, and the small size can dry out quickly. I've stopped using my yogurt cups with humidity lids except for small batches of seeds because they won't fit nicely into my 1020 trays.
Intheswamp liked this
User avatar
By Intheswamp
Location: 
Posts:  3406
Joined:  Wed May 04, 2022 2:28 pm
#429849
Yeah, I can see your points. A regular tupperware-type food container would probably be better...and plant more plants in it during the in-between grow stages. I need to get some 1020 trays and focus more on square pots...right now I'm using "this and that". I was looking at my plant stand last night at how disorganized it is with odd containers shoved up against each other. Styrofoam cups, food containers, miscellaneous plastic containers, Stearilite containers, actual flower pots(!), etc.,. You should see my collection of plastic "food" containers that I've saved...there's a whole new angle to grocery shopping now...clear containers add "value". :roll: I need to get things better organized...one day.<sigh>
User avatar
By Panman
Location: 
Posts:  6377
Joined:  Wed Mar 04, 2020 8:41 pm
#429850
Oh, I totally understand. That is where I started. After my containers started breaking down after a season because of UV sunlight, I started to transition to square pots. Now I can cram more plants into the space that I have. I've even found some large square containers for my larger pitcher plants. Granted, they are repurposed horse supplement containers, but they seem to hold up well to the UV light and they fit together nicely.
Intheswamp liked this
What’s happening

Im not sure how strong the grow lights are but the[…]

Rescue Sarracenia Rosea?

Here is the photo, didn’t upload for some re[…]

Atlanta Georgia Meetup

That is one heck of a setup. What are all the larg[…]

Yescom Altrnatives

Not the exact same as it is 150W but might work ou[…]

So this is the only "lone wolf" that I h[…]

Expanding the Garden

That's looking great!!! Some good-looking soil!!![…]

Counting to infinity.

2949

Ive been searching the web for perlite for two day[…]

Support the community - Shop at FlytrapStore.com!