

- Tue Oct 17, 2017 9:31 pm
#305595
Hi everyone! just sharing my setup for a 10g 10 x 20 highland tank.
Day temps: 73-80
Night temps: 55-60
Humidity: 78-99
Items needed:
Dremel tool / drill
Dremel 561 multi-cutting bit
Acrylic sheet big enough to cover the tank
Peltier element (2 core or higher recommended)
Styrofoam
SHARP utility knife
2 pc fans
glue gun
Items needed for fogger:
ultrasonic fogger
IP55 or higher rated fan (waterproof/resistant)
1/2" tubing
5 gal bucket with secure lid
IF YOU NEED HELP WITH WIRIING PLEASE ASK!!!!
To create fogger:
Drill / cut a hole in the lid of the bucket the size of the actual fan blades, not the whole unit itself.
Drill a hole for the fogger plug in the lid
Drill a 1/2" hole in the lid for your 1/2" tubing, this will be the input for your tank.
Place your fan over the hole and hot glue it down all around the sides to create a seal
Thread your fogger plug through the plug hole and seal that with got glue as well
If your tubing fits too loosely in the 1/2" hole then insert your tubing and seal that with hot glue as well and you are done!

To create terrarium:
First off I created a scaffold out of k'nex for the media to sit on, about 1" from the bottom. This allows the air to circulate under the media and aids in nighttime cooling.
Next I Mixed a batch of 80% lfsm, 15% perlite, and 5% silica sand and placed that on the scaffold.
Next I measured the top of the tank to make my lid using the clear acrylic sheet, scored HARD along the cut line using the utility knife, and just snapped the extra off using the edge of a table. (search scoring acrylic for more info)
Then I measured where I want my humidity input, marked, then drilled a hole using my dremel with a 1/2" grinding stone (you can use the 561 bit too, the grinding stone was a perfect fit for the 1/2" tube). place lid on tank to see how everything looks.
Measure the cooling side heatsinks on your peltier, and how far apart from each other they are. Decide where you want to place the peltier. I recommend near a corner or side, as the peltier will be blocking the light from above. Mark your cuts and place the peltier on top to be sure the holes will line up. Use the 561 bit and keep your drill/dremel on LOW RPM's (High RPM's will melt the plastic, you want to cut it) and cut out the holes for your peltier.
-You want to be sure that at least half of the cold side heat sink will actually be inside the tank, this will be very important later
Drill some holes on a corner furthest away from the peltier, these will be for venting. 9 normal drill holes arranged in a square grid should suffice.
Place one fan on top of the exhaust vent, the other blowing down along the fins of the peltier for some extra cooling. The hotter the heating side of the peltier is, the less effective it is, at nighttime place your other fan on the opposite side of the peltier when you put on the Styrofoam lid
Now for the Styrofoam:
I this part is optional, but will save you on your electric bill and increase the life of your peltier.
find sheets of Styrofoam the will cover the length of your tank. If you cant find any that are big enough, or any that are in your price range you can hot glue 2 sheets together, but it MUST be with a low temp glue gun. This will hold indefinitely and probably become the strongest part of the Styrofoam
I found a box of 12 -12"x12"x5/8" for 13$ on amazon, and I still have 4 sheets left over.
Cutting Styrofoam is easy, find the sharpest non-serrated knife you have and use a slow sawing motion to cut. If you go fast or push too hard than you will probably end up with tiny Styrofoam balls all over the place, and not have a clean cut.
MOST IMPORTANT BIT:
Cut a piece of Styrofoam the exact size of the whole peltier unit, then cut 2 holes for the cold side heatsinks in it as you did for the lid on the tank. Slide the Styrofoam on and put in place on the tank, make sure there is some of the heatsink protruding into the tank, the more the better. If it is above or level with the lid the cooling factor will be greatly reduced. If yours is too high try shaving a layer of Styrofoam off the top, trying to keep it as level as possible. Once you have it right hot glue the Styrofoam to the acrylic lid all the way around, creating a seal. Be careful, once glued Styrofoam holds tight, you will need to break the Styrofoam to get it off.
-This step is important because it will create a barrier between your hot and cold sides of the peltier. Without this barrier when your peltier powers off the top side will still be hot, this heat can escape though the peltier back into your tank, raising the temp again.
Measure each side of your tank and add 2x the thickness of the Styrofoam, this is so you can create locking pieces for around the tank, for every side piece make a 2" notch as thick as the thickness of the Styrofoam every 2"
Example:
For the top styrofoam lid measure where your humidity input hole is and where the peltier sits, then cut holes accordingly, don't worry about covering the vent holes.
Notes:
I recommend wiring the peltier so the hot-side fans are always on, this will help keep the heat from flowing back into the peltier and your tank.
If you have an old Xbox 360 power brick they work perfectly for the peltier
Fuses for the peltier are recommended if your power source doesn't have a form of overheat-oveamperage protection
Low temp hot glue will stick to acrylic, but wont melt it and peels away easily without leaving a mark.
AGAIN, IF YOU NEED HELP WIRING PLEASE ASK!!!
there are at least 8 amps heading to the peltier. it only takes .1-.3 amps to kill a person.
PLEASE BE CAREFUL, NEVER WORK ON ANYTHING WHILE IT IS PLUGGED IN
Tank in the daytime:
I will post the nighttime pic later when i actually put it together for the night
Day temps: 73-80
Night temps: 55-60
Humidity: 78-99
Items needed:
Dremel tool / drill
Dremel 561 multi-cutting bit
Acrylic sheet big enough to cover the tank
Peltier element (2 core or higher recommended)
Styrofoam
SHARP utility knife
2 pc fans
glue gun
Items needed for fogger:
ultrasonic fogger
IP55 or higher rated fan (waterproof/resistant)
1/2" tubing
5 gal bucket with secure lid
IF YOU NEED HELP WITH WIRIING PLEASE ASK!!!!
To create fogger:
Drill / cut a hole in the lid of the bucket the size of the actual fan blades, not the whole unit itself.
Drill a hole for the fogger plug in the lid
Drill a 1/2" hole in the lid for your 1/2" tubing, this will be the input for your tank.
Place your fan over the hole and hot glue it down all around the sides to create a seal
Thread your fogger plug through the plug hole and seal that with got glue as well
If your tubing fits too loosely in the 1/2" hole then insert your tubing and seal that with hot glue as well and you are done!

To create terrarium:
First off I created a scaffold out of k'nex for the media to sit on, about 1" from the bottom. This allows the air to circulate under the media and aids in nighttime cooling.

Next I Mixed a batch of 80% lfsm, 15% perlite, and 5% silica sand and placed that on the scaffold.
Next I measured the top of the tank to make my lid using the clear acrylic sheet, scored HARD along the cut line using the utility knife, and just snapped the extra off using the edge of a table. (search scoring acrylic for more info)
Then I measured where I want my humidity input, marked, then drilled a hole using my dremel with a 1/2" grinding stone (you can use the 561 bit too, the grinding stone was a perfect fit for the 1/2" tube). place lid on tank to see how everything looks.
Measure the cooling side heatsinks on your peltier, and how far apart from each other they are. Decide where you want to place the peltier. I recommend near a corner or side, as the peltier will be blocking the light from above. Mark your cuts and place the peltier on top to be sure the holes will line up. Use the 561 bit and keep your drill/dremel on LOW RPM's (High RPM's will melt the plastic, you want to cut it) and cut out the holes for your peltier.
-You want to be sure that at least half of the cold side heat sink will actually be inside the tank, this will be very important later

Drill some holes on a corner furthest away from the peltier, these will be for venting. 9 normal drill holes arranged in a square grid should suffice.
Place one fan on top of the exhaust vent, the other blowing down along the fins of the peltier for some extra cooling. The hotter the heating side of the peltier is, the less effective it is, at nighttime place your other fan on the opposite side of the peltier when you put on the Styrofoam lid

Now for the Styrofoam:
I this part is optional, but will save you on your electric bill and increase the life of your peltier.
find sheets of Styrofoam the will cover the length of your tank. If you cant find any that are big enough, or any that are in your price range you can hot glue 2 sheets together, but it MUST be with a low temp glue gun. This will hold indefinitely and probably become the strongest part of the Styrofoam
I found a box of 12 -12"x12"x5/8" for 13$ on amazon, and I still have 4 sheets left over.
Cutting Styrofoam is easy, find the sharpest non-serrated knife you have and use a slow sawing motion to cut. If you go fast or push too hard than you will probably end up with tiny Styrofoam balls all over the place, and not have a clean cut.
MOST IMPORTANT BIT:
Cut a piece of Styrofoam the exact size of the whole peltier unit, then cut 2 holes for the cold side heatsinks in it as you did for the lid on the tank. Slide the Styrofoam on and put in place on the tank, make sure there is some of the heatsink protruding into the tank, the more the better. If it is above or level with the lid the cooling factor will be greatly reduced. If yours is too high try shaving a layer of Styrofoam off the top, trying to keep it as level as possible. Once you have it right hot glue the Styrofoam to the acrylic lid all the way around, creating a seal. Be careful, once glued Styrofoam holds tight, you will need to break the Styrofoam to get it off.


-This step is important because it will create a barrier between your hot and cold sides of the peltier. Without this barrier when your peltier powers off the top side will still be hot, this heat can escape though the peltier back into your tank, raising the temp again.
Measure each side of your tank and add 2x the thickness of the Styrofoam, this is so you can create locking pieces for around the tank, for every side piece make a 2" notch as thick as the thickness of the Styrofoam every 2"
Example:


For the top styrofoam lid measure where your humidity input hole is and where the peltier sits, then cut holes accordingly, don't worry about covering the vent holes.
Notes:
I recommend wiring the peltier so the hot-side fans are always on, this will help keep the heat from flowing back into the peltier and your tank.
If you have an old Xbox 360 power brick they work perfectly for the peltier
Fuses for the peltier are recommended if your power source doesn't have a form of overheat-oveamperage protection
Low temp hot glue will stick to acrylic, but wont melt it and peels away easily without leaving a mark.
AGAIN, IF YOU NEED HELP WIRING PLEASE ASK!!!
there are at least 8 amps heading to the peltier. it only takes .1-.3 amps to kill a person.
PLEASE BE CAREFUL, NEVER WORK ON ANYTHING WHILE IT IS PLUGGED IN
Tank in the daytime:

I will post the nighttime pic later when i actually put it together for the night
Rammplins liked this


 - By pandaking666
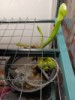 - By andynorth
 - By Intheswamp
 - By Nikson