
- Sat Jun 22, 2019 6:06 pm
#338909
While this may be somewhat duplicative of the ICPS page about this, I thought it might be worth sharing my process for cleaning seeds and making packets.
While this demonstration is with VFT seeds (which are easy), I use the same method for all seeds I packetize (carnivorous or not).
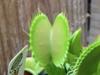
The first step is to harvest your seeds. When they’re ready, either snip them off a pod at a time (I use this for VFTs and sundews I’m worried about losing seeds from) or snip off the whole stalk. Put them in a paper envelope and let it dry in the fridge. I didn’t get a photo of the VFTs, so this is a Drosera burmannii stalk.
 0BF0C90E-A52D-457E-B22E-37857D93F67C.jpeg (1.23 MiB) Viewed 7648 times
When you’ve collected enough seed and they are dry, dump it all out onto a piece of paper and begin removing the largest pieces of chaff by hand. For VFTs, I take one pod at a time and tease out the seeds. For sundews, I use tea strainers and crush the flower stalks against them. You’ll end up with something like this.
F700BE2F-D6FE-42B7-BB78-FCACE5AEB4D2.jpeg (1.1 MiB) Viewed 7648 times
With another sheet of paper to catch them, gently tilt the first sheet to roll seeds off of it. The seeds tend to roll before the chaff does. This takes some practice, but does a great job of separating them. I tap the upper sheet and sometimes stop and rearrange everything with a toothpick so the seeds are closer to the edge.
0BF0C90E-A52D-457E-B22E-37857D93F67C.jpeg (1.23 MiB) Viewed 7648 times
When you’ve collected enough seed and they are dry, dump it all out onto a piece of paper and begin removing the largest pieces of chaff by hand. For VFTs, I take one pod at a time and tease out the seeds. For sundews, I use tea strainers and crush the flower stalks against them. You’ll end up with something like this.
F700BE2F-D6FE-42B7-BB78-FCACE5AEB4D2.jpeg (1.1 MiB) Viewed 7648 times
With another sheet of paper to catch them, gently tilt the first sheet to roll seeds off of it. The seeds tend to roll before the chaff does. This takes some practice, but does a great job of separating them. I tap the upper sheet and sometimes stop and rearrange everything with a toothpick so the seeds are closer to the edge.
Because the seeds are big and round, VFTs usually come clean by doing this only once. Sundews may take a couple passes of this. What can help with sundews is running a toothpick across the seeds gently: because the seeds are so small, the chaff generally gets moved with the toothpick and the seeds don’t.
6FD3FFC1-BFCF-488B-83CE-FC86E28095F4.jpeg (1.03 MiB) Viewed 7648 times
Once you’ve done this a few times, pick out any remaining bits of chaff with a lightly moistened toothpick. This takes practice, but is worth doing to get super clean seeds. I usually don’t have to do it for flytraps, but sundews often need it. Put everything into a neat little pile once this is done.
2D774C88-58D8-4827-B954-46EDC52DA22F.jpeg (1004.94 KiB) Viewed 7648 times
You may have a lot of chaff left over. Here’s the chaff from this batch of ~200 VFT seeds.
688A2A3B-6B73-4F8D-93AE-7D172C440F27.jpeg (1.02 MiB) Viewed 7648 times
Separate out an approximate amount of seeds you want in one packet. For flytraps, I usually do ~40. For common sundews, I do 150+. I don’t bother counting them out for sundews, but I do for bigger seeds.
E72BDB12-D1CD-4AFA-8CE5-C6840AF06F12.jpeg (989.64 KiB) Viewed 7648 times
Grab a 3" wax paper square and fold up one edge a bit (maybe 1/8"). Place the seeds you separated inside the crease and pile them up. This is to serve as an example of how big a packet should be. Once you’ve made a bunch of packets, you shouldn’t need the example to portion out the seeds equally. Set this aside somewhere you can see it (be careful because the seeds aren’t contained!).
0F21DF09-011F-401E-93DE-EF04F33F2834.jpeg (1.12 MiB) Viewed 7648 times
Grab another wax paper square, fold up the edge, and pour a quantity of seeds approximately equal to the example from the paper into the crease. Fold the edge over them, then fold down over the edge.
FD0FBBC5-4675-4238-961D-F60218A6AF62.jpeg (1.11 MiB) Viewed 7648 times
Pull the packet towards the edge of the table you’re working on and tuck the top end under the edge of the packet and crease without flipping over the packet. This takes practice. I forgot to take photos of this part, so I unfolded one packet to demonstrate, but it’s the same when folding a new packet.
04ABA5D3-F53C-472E-9F42-378D1D3C9A25.jpeg (1.12 MiB) Viewed 7648 times
BF878A15-E5ED-486C-B10D-C888E8E7BCBD.jpeg (1.12 MiB) Viewed 7648 times
You can then fold it back down on top and continue folding around it until there’s no extra paper. One side will have a loose edge like this.
8F4A30FF-61B2-4DC8-BBA7-8EC6E0DA57A9.jpeg (1020.34 KiB) Viewed 7648 times
Flip the packet so that side is touching the work surface, and fold it approximately in thirds.
F2665E9C-D818-4026-878B-ADF0062A255A.jpeg (1.01 MiB) Viewed 7648 times
Tuck one side under the loose edge of the other.
2B04CA7C-DE9A-47D3-A934-4B922855F2D1.jpeg (1.11 MiB) Viewed 7648 times
Flatten to make the packet.
09EC7292-C869-4EA4-8E2F-339BF770847B.jpeg (1.24 MiB) Viewed 7648 times
Repeat this process until all seeds are packetized, then finish folding the example packet.
0A47917E-CCC1-487A-B918-F2A4026B0AB8.jpeg (1.26 MiB) Viewed 7648 times
Plop them in a paper with the species, number of packets, and harvest date written on it. I re-use the envelope I’d used for drying the seeds.
3BA38083-AEA5-472A-A19A-F75DEE95BEB8.jpeg (1.53 MiB) Viewed 7648 times
Put your envelope of seed packets in the fridge until you’re ready to send them off.
I hope this helps anyone who is curious about making seed packets.
Sundew Seed Harvest and Cleaning:
Because I’ve had a few requests for this, I’m adding it to the thread. First up is harvesting sundew seeds. They ripen from the bottom of the stalk to the top. Whenever the pod turns brown or black or grey (depending on species) and looks dry, it’s ready to harvest. For weedy species with long flowerstalks, this can happen for the bottommost pods when the top is still opening flowers. This can be a nuisance because the seeds will begin to fall out and get everywhere, so I harvest these before the whole stalk is ripe. If I really want top-quality seeds and it’s a plant I don’t have many of, I’ll cut off pods individually as they ripen. Here’s some sundew stalks I harvested on 7/10 and the stage I cut them in.
D. spatulata — Beenak, Vic., Aus.:
159D6CF6-687B-4D31-9FB8-D4BB9DDFD805.jpeg (2.26 MiB) Viewed 7495 times
D. burmannii:
A385231A-CC7D-4596-8F36-67C458C1CE11.jpeg (1.42 MiB) Viewed 7495 times
91AC8CD7-5911-48AC-BC48-C80E3EF2269F.jpeg (1.51 MiB) Viewed 7495 times
D. spatulata 'Tamlin':
AA4F44B4-E0DB-436F-B1B5-E30819D82A85.jpeg (1.69 MiB) Viewed 7495 times
After letting them dry for a few days in the fridge, I take out the envelope. These are D. spatulata — Beenak, Vic., Aus. harvested on 7/10 and cleaned today, 7/12:
A50D4125-F119-4B09-9482-A8EBE9CEF7C7.jpeg (1.11 MiB) Viewed 7495 times
I pour the seeds and everything through a tea strainer over a sheet of paper:
BB9D50CA-7602-4BB5-8A44-D18F1DF98C26.jpeg (1.86 MiB) Viewed 7495 times
I crush the pods and stalks against the strainer to get out most or all of the seeds:
D74E7B19-8E76-48DC-AE0D-01086353CE11.jpeg (1.92 MiB) Viewed 7495 times
This results in a lot of chaff. You may notice some of these seeds are green: I’ve found that this particular variety has green seeds until the pod is right at the verge of breaking open. They’re slightly underripe, but they turn black after some storage and I’ve never had issues with them sprouting. I do add extra seeds to a packet when there’s a lot of them like with this batch. My other sundews seem to have black seeds well before the pod begins breaking open — it’s just a quirk of this variety.
86941DCB-17F5-46C5-ABDA-DBA42E210D6B.jpeg (1.04 MiB) Viewed 7495 times
Dragging a toothpick through everything separates most of the big chaff with only a few passes:
AD26570F-43F5-4636-A4B6-5AC65B873680.jpeg (1.07 MiB) Viewed 7495 times
After that, pouring the seeds gently onto another sheet gets rid of small, less viable seeds, infertile seeds, and most of the rest of the chaff:
3DC02471-50D8-48D3-80DE-8A2814438EB2.jpeg (1.06 MiB) Viewed 7495 times
I pick out the rest of the chaff with a moistened toothpick:
F5B4474B-77B6-4BEA-99A4-3276ECE9F14A.jpeg (1.16 MiB) Viewed 7495 times
And I portion and fold seed packets as above:
EB114668-31BD-4D78-9FC5-40695F3DBD1E.jpeg (1.05 MiB) Viewed 7495 times
1F36FB25-333A-4082-ADBD-28635E069240.jpeg (1.14 MiB) Viewed 7495 times
While this demonstration is with VFT seeds (which are easy), I use the same method for all seeds I packetize (carnivorous or not).
The first step is to harvest your seeds. When they’re ready, either snip them off a pod at a time (I use this for VFTs and sundews I’m worried about losing seeds from) or snip off the whole stalk. Put them in a paper envelope and let it dry in the fridge. I didn’t get a photo of the VFTs, so this is a Drosera burmannii stalk.
Because the seeds are big and round, VFTs usually come clean by doing this only once. Sundews may take a couple passes of this. What can help with sundews is running a toothpick across the seeds gently: because the seeds are so small, the chaff generally gets moved with the toothpick and the seeds don’t.
I hope this helps anyone who is curious about making seed packets.
Sundew Seed Harvest and Cleaning:
Because I’ve had a few requests for this, I’m adding it to the thread. First up is harvesting sundew seeds. They ripen from the bottom of the stalk to the top. Whenever the pod turns brown or black or grey (depending on species) and looks dry, it’s ready to harvest. For weedy species with long flowerstalks, this can happen for the bottommost pods when the top is still opening flowers. This can be a nuisance because the seeds will begin to fall out and get everywhere, so I harvest these before the whole stalk is ripe. If I really want top-quality seeds and it’s a plant I don’t have many of, I’ll cut off pods individually as they ripen. Here’s some sundew stalks I harvested on 7/10 and the stage I cut them in.
D. spatulata — Beenak, Vic., Aus.:
Last edited by bananaman on Fri Jul 12, 2019 5:59 pm, edited 2 times in total.


 - By fluffy123
 - By Panman
 - By ChefDean
 - By Camden
 - By stephenboss2000